
How to Take Professional Self Portraits (When You Haven't Hired a Photographer Yet)

A guide for photographers, business owners, and anyone who knows they need better photos of themselves but isn't quite ready to hand the camera over.
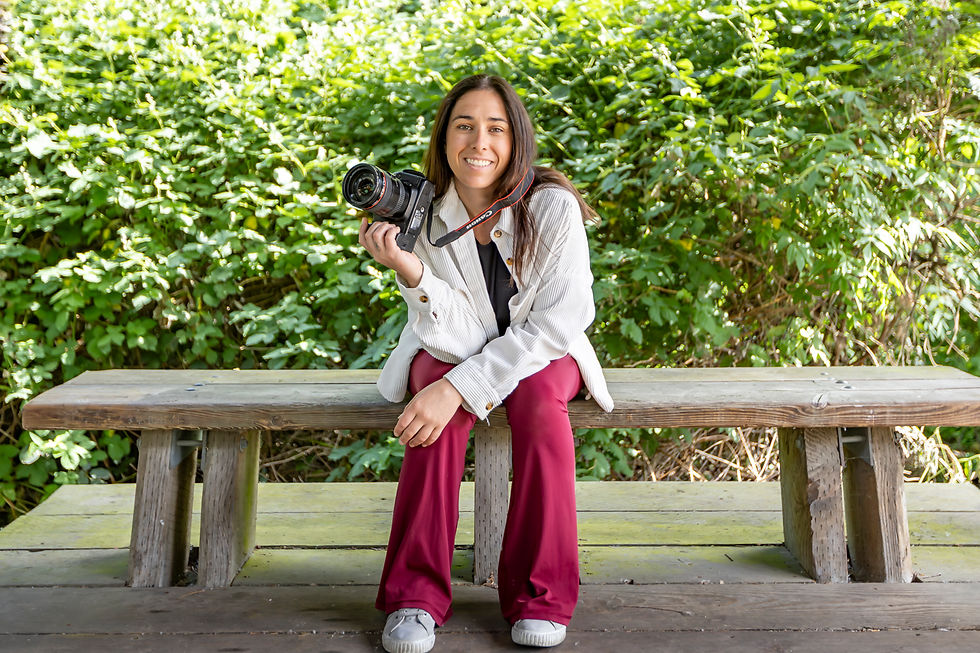
I'll be honest with you. As a photographer based in Vancouver who shoots equine and canine portraits and branding sessions for people in this industry, I didn't have a single professional photo of myself that I actually liked.
I had a few. Technically solid. Taken at a studio training session. And I absolutely hated every time I looked at them, because it felt nothing like me.
So a few weeks ago, I picked up my Canon R6 Mark II, grabbed my dog, and did something about it.
This post is everything I learned, the setup, the outfits, the mistakes, and the honest truth about why self portraits are a great bridge but not the destination. I'll be updating it once I've done a proper session with another photographer, so you can see the difference side by side.
But for now. Let's get you some photos you actually want to use.

Before you even touch your camera: get clear on who you are in these photos
This is the step most people skip, and it's the reason so many "professional" photos feel flat or forgettable.
Your brand photos should look and feel like you, not a polished, stiff version of you that nobody would recognise. Before you start, ask yourself: where do I actually show up in my work, what do I wear when I feel most like myself, and what energy do I want people to feel? Those answers are your brief.
Step 1: Choose your location with intention
Pick somewhere that makes sense for your brand, if you work outdoors with animals, shoot outside. If your brand is warm and earthy, find a space that reflects that. The goal is for someone to look at your photos and immediately understand the world you live and work in.

On lighting: Natural light is your best friend. Golden hour, the hour after sunrise or before sunset, gives you warm, soft, flattering light. Shade or overcast days are underrated too; the clouds act as a giant softbox. Avoid harsh midday sun.
Pro Tip: The further from the background you are the more background blur you will achieve. Avoid noisy backgrounds. Even a forest can feel too busy make sure you have a simple background.
Step 2: Outfits, wear something you feel amazing in
This matters more than you think.
Bold outfits photograph beautifully, but they're harder to style and easier to get wrong. I wore red pants because I wanted energy in the frame, and it worked because I love to wear bold colours from time to time. Don't wear something bold just because it photographs well if you'd never actually wear it. That inauthenticity shows.

A reliable approach: bring two outfits, one that feels completely you, and one with a little more intention. A colour, a texture, something that pops. And avoid anything you feel self-conscious in. If you're thinking about it while you're shooting, it'll show.
For Photographers it is so important to have photogrpahs of you with a camera! If you dont have two cameras, ask a friend to borrow one or rent the cheapest one you can find. Another reason why hiring a professional just makes sense.
Step 3: Camera setup, two ways to do this
You will need a tripod for both options to make this as easy as possible.
Option A: WiFi camera + phone app (recommended)
If your camera connects to WiFi, this is the game changer. Download the Canon Camera Connect app (or the equivalent for your camera brand, Nikon SnapBridge, Sony Imaging Edge, etc.) and connect your camera to your phone.

This means you can:
See a live view of the frame on your phone
Trigger the shutter yourself at the exact right moment
Adjust composition and settings without running back to the camera
Camera settings to dial in:
Enable Eye AF — auto eye focus means the camera locks onto your eyes automatically, which is essential when you're both subject and photographer
Drive mode: Continuous timer (10 second delay, then choose how many frames to shoot in a burst) great for getting multiple options per pose. Or single shot with a 2 second timer for more deliberate shots.
Shoot in a wide aperture (f/1.8–f/2.8) for that beautiful background blur that separates you from the scene
Option B: Flip screen + self timer (no WiFi)
If your camera has a flip-out or articulating LCD screen, you can angle it toward you so you can see yourself in frame without an app.
Set your self timer to 10 seconds, press the shutter, get into position, and shoot. Use the continuous burst setting if you have it so you get multiple frames per timer cycle.
It's slower and requires more back-and-forth to check your composition, but it absolutely works. Be patient with yourself, this method takes longer and that's okay.
Tripod tip: Get your framing right before you start shooting. Place something, a bag, a jacket, a willing dog, where you'll be standing, and use that to focus and compose your shot. Then step in and go.

Step 4: Shoot more than you think you need
You're doing the job of two people, so you need volume to get the selects. Don't expect to love the first few frames, the best ones almost always come once you've relaxed and stopped thinking about the camera.
With your dog? Multiply that by ten. You need a lot of frames to catch the moment, which is also, not coincidentally, one of the best reasons to hire a professional when animals are involved.

I could NOT time a photo of Ulu between my legs looking up at me! look at this attempt, ugh. This is where having a pro on the other side of the camera is key.
A note on why self portraits are a bridge, not the destination
I'm going to be real with you, because I think you deserve honesty more than a tidy conclusion.
Self portraits are a valid, practical solution when you're not ready to invest in a professional yet. They're infinitely better than an outdated photo, a blurry phone snap, or, worse, no photo at all. Do them. Use them. Show up.

But here's what doing this session taught me, as someone who photographs other people for a living:
You cannot be on both sides of the camera at once. Working the phone app while also trying to be present, natural, and connected? It splits your attention in a way that shows in the photos. A professional is watching only you, they see the exact moment your eyes light up, the split second your dog turns toward you, the angle you didn't know looked good. You will never catch that on a timer.
The editing alone. If you have clients to take care of, your own images are the last thing you want to be sitting down to edit. A professional delivers finished work. Your time is worth something.
And then there's the authenticity question. The whole point of these photos is to show people who you really are. That's genuinely hard to do alone, because we see ourselves very differently to how others see us. You may know yourself best but a photographer who understands your brand and your personality can draw out the version of you that your clients actually need to see.

I'll be doing a professional session of my own soon. And I'll update this post with a full before and after so you can see exactly what the difference looks like in practice.
Until then: go take the photos. Just don't stop there.
Brooke's Photography is based in Vancouver, BC, specialising in equine and canine portrait photography and professional branding for the equine and canine industry across the Lower Mainland.
Ready to stop being the least-photographed person in your equine or canine business? Let's talk about what a session could look like for you.
For my Pet Portrait Style Guide join the Brookes Photography email list. Subscribe below.


Comments